How to Photograph Hummingbirds
Hummingbirds are an exciting and fun animal to photograph. These birds, endemic to the Americas, are constantly in motion, flapping their wings up to 70 times per second. Flitting from place to place they express their personalities, squeaking and jostling each other for feeding opportunities. The sun reflects off of their tiny feathers, giving the appearance of some type of gemstones or dragon scale. Getting a sharp, detailed photo of a hummingbird is incredibly rewarding.
These unique birds can also be incredibly difficult to capture. Due to their quick movements and ridiculous wing speed it takes not only good lighting, but also the correct camera settings to get that sharp, National Geographic quality image.
Equipment
At the very least you will need the following pieces of equipment to properly photograph your hummingbird:
DLSR or compact camera capable of shooting in manual mode with high shutter speeds
Zoom or telephoto lens for DLSR; zoom capabilities for compact camera
Tripod (Optional) - A tripod can help sturdy your images, but great images can still be captured without one.
Lighting - Using Natural Light
Hummingbirds often frequent flowers and hummingbird feeders. This makes it relatively easy to understand where they will be, and at what time. Hummingbirds can visit anywhere from 2000 - 3000 flowers each day! Once you understand where a hummingbird frequents, you can start thinking about the best time of day to capture the little fella.
The light of our subject is extremely important. As we will see later due to the hummingbird’s quick movement speed we will need to utilize settings that require as much light as possible. Therefore, if you can, choose a time of the day when the sun will be shining directly on or near your subject. This will help to illuminate the fine details of the hummingbird and freeze frame those ever flapping wings.
Lighting - Using a Flash
It is also possible to simulate the sunlight by utilizing either your camera’s built in flash or an external flash. I personally prefer to avoid this method if possible, but many time hummingbird habitats may be under a patio or in dense foliage, and getting a sharp, properly exposed image won’t be possible without utilizing your flash. Take a few sample photos of the area you intend to illuminate to get an idea of how much light you’ll need to generate. Doing this before hand will not only help you get a proper exposure, but also stop you from blinding the poor critter.
Choosing Your Camera Settings
Just behind the lighting of your subject is the settings that we will use to effectively capture a hummingbird. If you aren’t familiar with any of these settings most modern cameras do a great job in priority modes or automatically setting many of these. I’m including settings that I configured with a Nikon D7200; these may vary based on your camera brand and model.
Basic Settings
Continuous Photo Mode
Having your camera configured to snap off a series of quick shots is optimal in this situation. You will want to set your release mode on your camera to allow the highest number of frames per second (FPS). On a Nikon, this is notated as “Ch”, for Continuous-high.
Fast Shutter Speed
Based on what we know about a hummingbird’s fast movement speed, an equally fast shutter speed will be key to capture a sharp image of those wings. If you want to show the motion for artistic purposes you could use a bit slower of a speed. I wouldn’t recommend anything slower than 1/250; even at that speed the wings of your hummingbird will be blurred. To get a clear, crisp image you’ll want to push the shutter as fast as you can while still maintaining solid exposure.
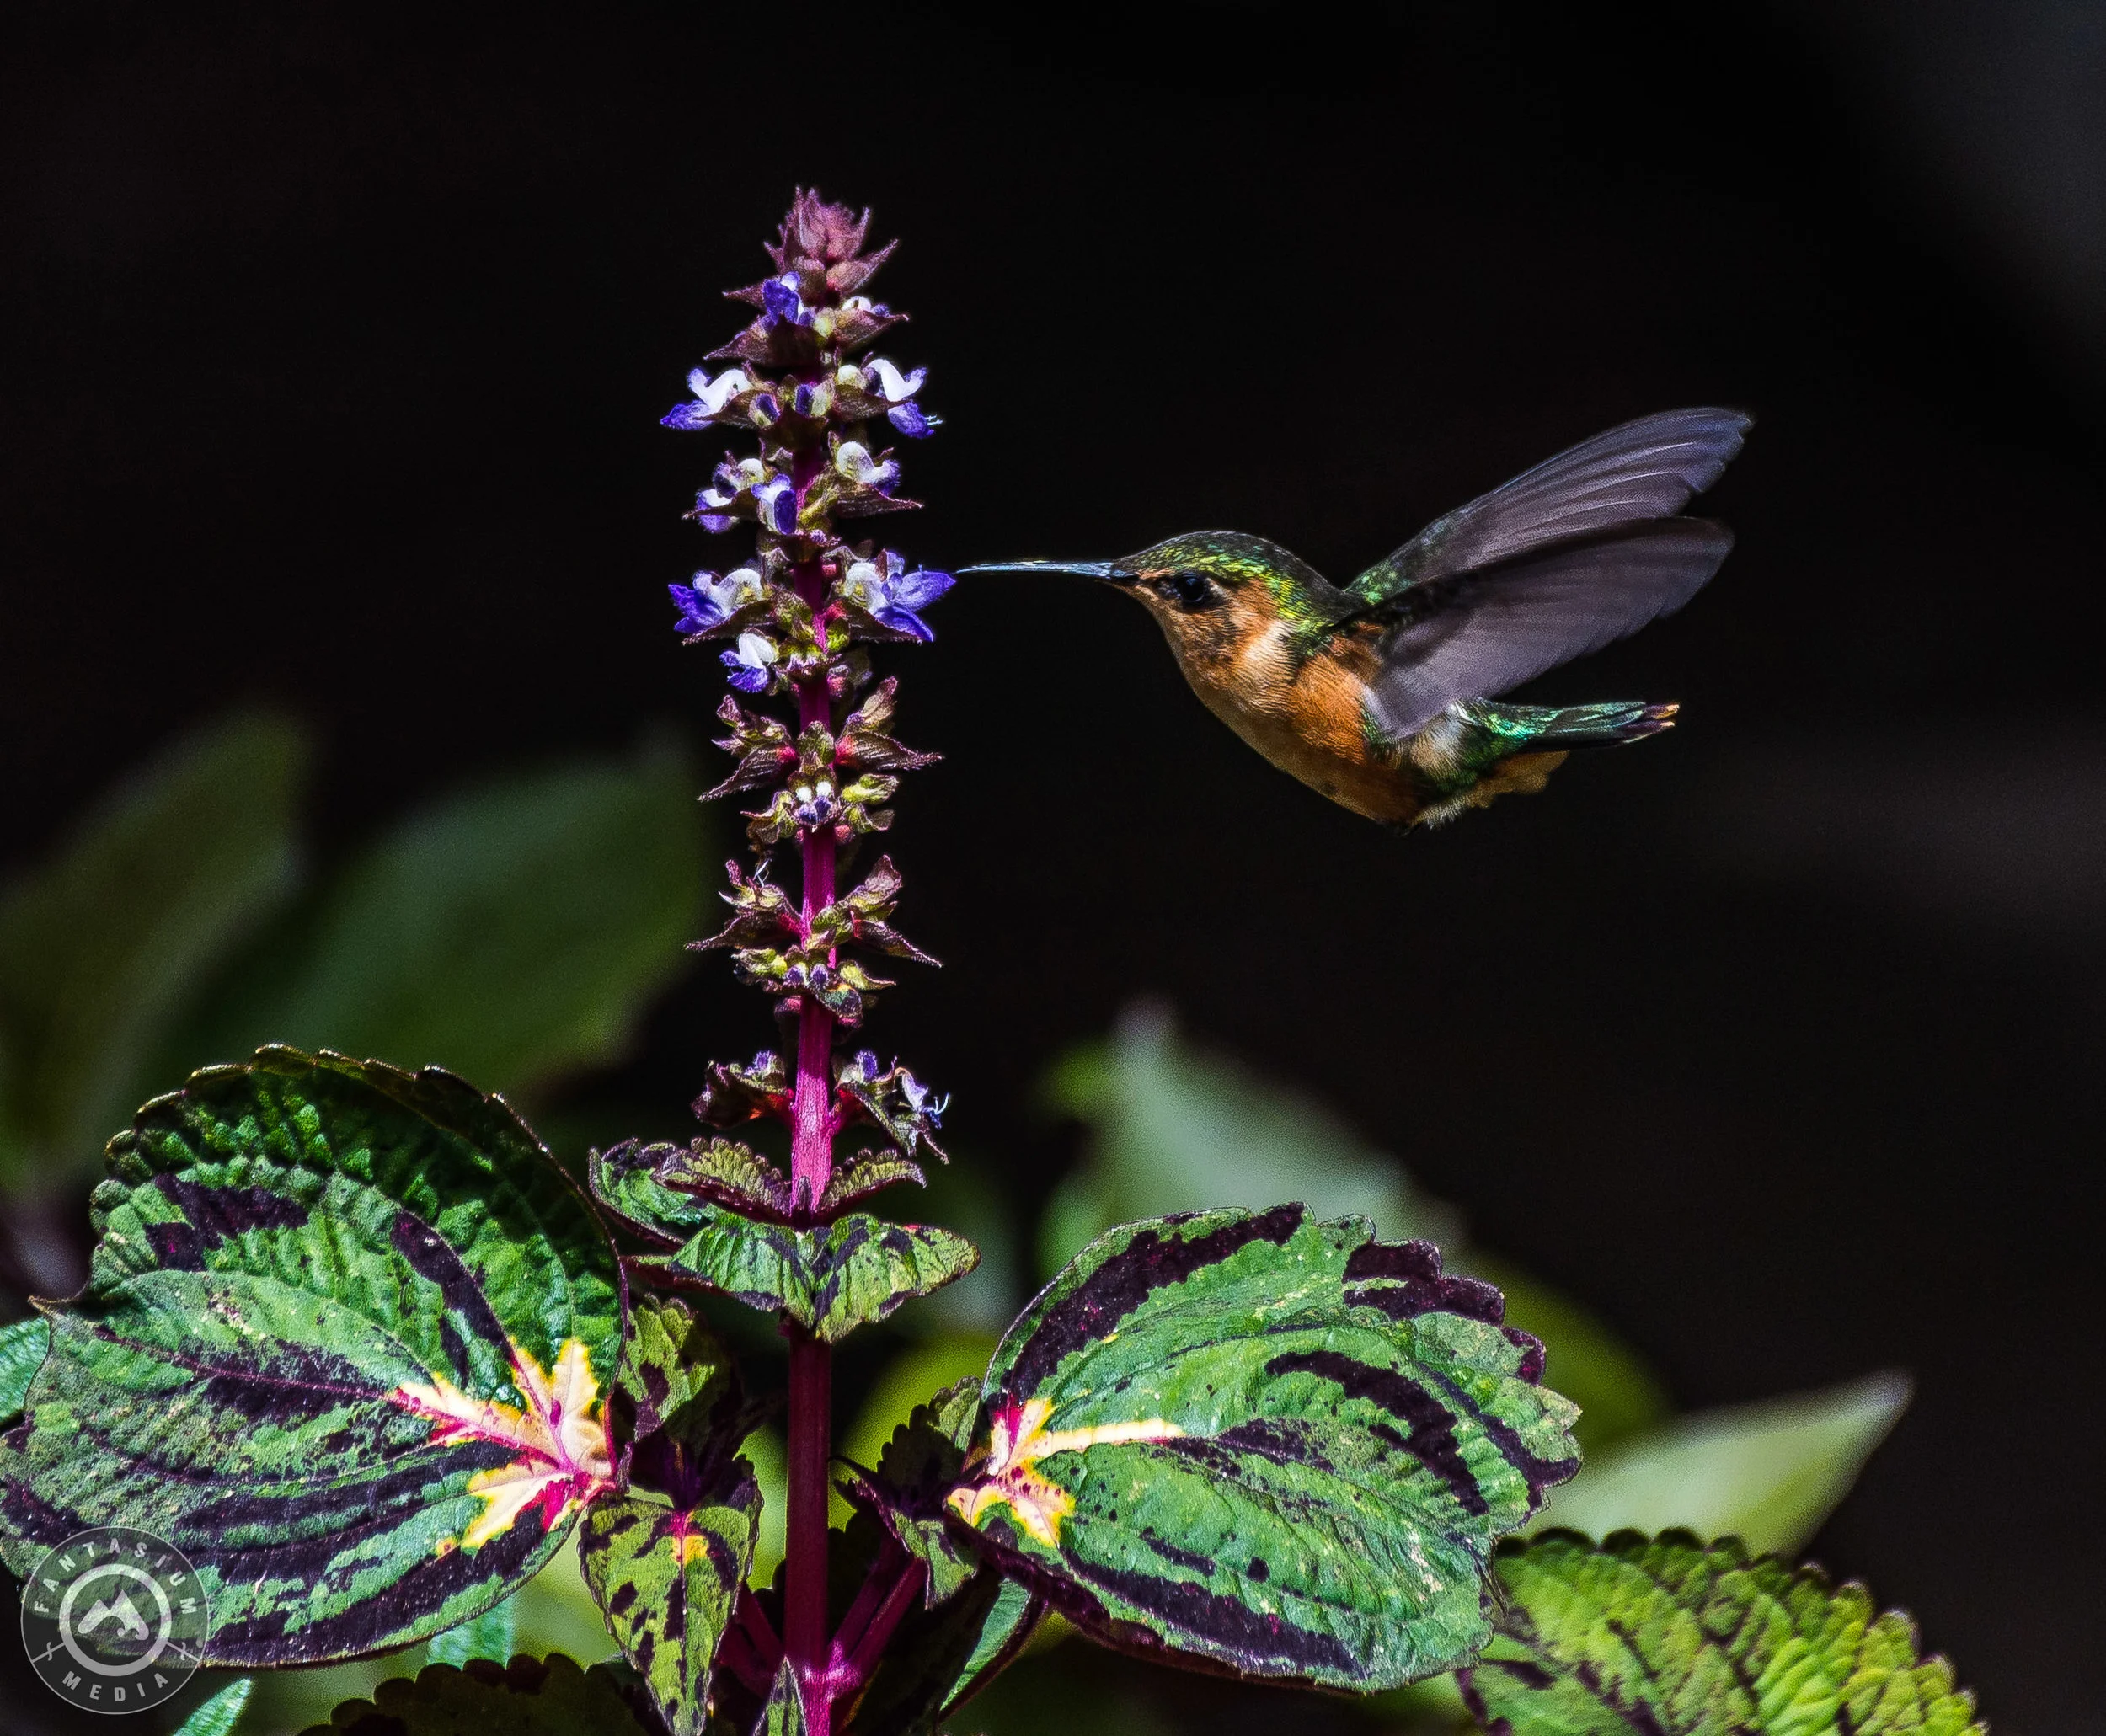
This photo was captured using a shutter speed of 1/640, which you can see wasn’t even fast enough to completely freeze the bird’s wings. Once you get into higher shutter speeds you can also use them for creative effect; if you are able to get close enough to the bird and shoot into a dark background, you can “backlight” the subject, which means the background remains dark, but the subject fully exposed. This provides additional contrast and adds interest to the subject of the photo.
Wide Aperture
Because of our fast shutter speed we will want to shoot with a very wide aperture to let in lots of light. It can also give solid depth of field to the photo, bringing the subject into focus and creating a nice background effect.
ISO
ISO can get a bit tricky depending on how much light you have. If it’s a well light scene, no problem. Push the ISO as low as it can go. If you need extra light, you can certainly push the ISO up a bit, but I wouldn’t recommend going above 800.
Focal Length
This will be completely dependent on your lens and the scene. Having a shorter focal length will give you more light, so get as close as you can to your subject without disturbing them and use a shorter focal length that gives enough light and accentuates the depth of field. On my 18 - 140 mm I usually shoot somewhere around 35 - 50mm unless I can’t get close enough, then I dial in the focal length a bit further.
Advanced Settings
These are settings that require knowledge beyond the exposure triangle but can help improve your results.
Metering
If your camera allows you to adjust the metering settings I would recommend using a matrix or partial metering to evenly expose the whole scene.
Focus Mode
For a fast and unpredictably moving hummingbird I’ll utilize the Autofocus on my camera, using an AF-C (Autofocus Continuous) Mode with a 51-point dynamic focus area.
Preparing for the Shot
Once you have your settings configured and your camera on your tripod you’re ready to shoot! Hummingbirds often frequent the same location; if that is the case with your subject you can post up and focus on that exact spot. When the hummingbird flies into frame, boom! Snap off as many photos as you can. You can also try “hunting” for one, but this tactic will be much more difficult.
Your camera is ready and so are the amazing hummingbirds - get out there and snap some shots! We would love to see any images you take that you are proud of. Shoot us an email at dloud@fantasiummedia.com with your results.